Friday, October 29, 2010

We Stamp for Lara

We Stamp For Lara is an online stamping event, and it's in support of raising funds for Madonna Dunn's daughter, Lara May, who needs some essential equipment to make her life a little bit easier.  You can read more about Lara here.  
To join in and buy your entry to this fabulous event, go to Madonna Dunn's blog or Alisa Tilsner's blog.  Invitations to the Online Community will be sent out closer to the 1st November.
Just Add Ink are giving away a free pass go over and check it out.

Just Add...

...Birthday.
This week add Just Add Ink Challenge # 41 is add a birthday.
This the birthday card I have made for my Mum's birthday last Monday.
This is a Tri-shutter Card, they are very easy to make.
I have used Elegant Soiree DSP, I love this DSP.
I have made a matching Expansion Album for her present, I will show you that after she has recieved them.
I know I said that her birthday was last Monday, I was waiting on the ribbon to arrive so I have only just it finished this week.
Supplies List
Stamps: Baroque Motifs and On Your Birthday.
Ink: Soft Suede and Frost White Shimmer Paint.
Cardstock: Early Expresso, Baja Breeze, Soft Suede and Elegant Soiree DSP.
Extras: Big Shot, Beautiful Wings Embosslits, 2 Way Glue Pen, Dazzling Diamonds and Basic Pearls.
If you would like to made a Tri-shutter Card contact for a workshop.
Have a great weekend.

Wednesday, October 27, 2010

Expansion Albums @ After School Club

Here are some photos of the Expansion Album the kids made at the After School Club.
We have taken 2 weeks to complete these.
We have used retired DSP.
This is Kieran's the outside.
Kieran's 7 year old.
Clarabelle 5 years old.
Phoebe's 7 years old.
Samuel's (my son) 5 years old.
 I have soft focused the above albums for the kids privacy.
They have done a fantastic job on the album.
If you would like to learn how to make and Expansion Album contact me and get a few friend together for a class.
They made a fantastic gift, great for Grandparents for Christmas presents.

Monday, October 25, 2010

Garden Photos As...

...Promised.
Top left: Inside glasshouse 7 tomato plants. Middle: Glasshouse closeup of tomato and cucumber plants. Right: 3 rows of potatoes.
Bottom left: 3 rows of corn, beetroot and 2 rows of carrots and 1 row of radishes, which I sowed on Saturday. Middle: Mint, black berry brush, chives. Right: Silver Beet and red cabbage.
Top left: Spring onions, Gooseberry bush, there are 3 of them last summer we got 7kgs of them.
Middle: Lettuces. Right: More lettuces.
Bottom Left: Broccoli. Middle: Cabbages. Right: Cauliflowers.
Top Left: Grapevine (Red). Middle: Black Boy Peach Tree, we got heaps of peaches last year, we are still enjoying the jam made from them, with strawberries around the bottom Samuel watering them. Right: Cabbages.
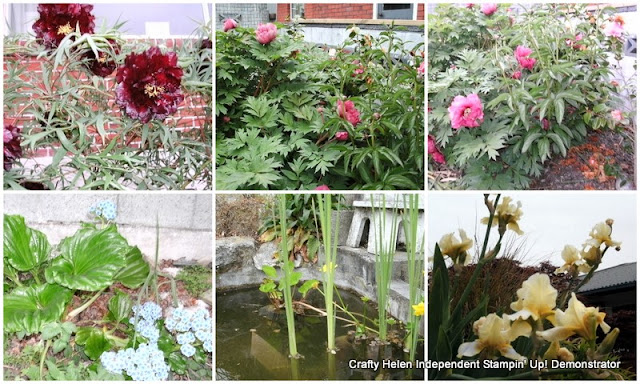
Bottom Left: Rhubarb. Middle: Apricot and Pink Peonies. Right: Yellow Bearded Iris.
Top Left: Maroon Tree Peonies. Middle: Deep Pink Tree Peonies. Right: Peonies and Camellias.
Bottom Left: Chatham Island Lillies Blue. Middle: Yellow Buttercup and Bull Rushes in one of our fish ponds. Right: Yellow Iris.
It has been Labour Day here in New Zealand, so for most people a long weekend. 
The weather has been great, we have enjoyed our weekend and a far bit of time in the garden.
We have had 2 new additions to the household this last week, Our Canaries have had 2 chicks.
They had laid 4 eggs but we found 2 broken on the bottom the cage. 
So I had to search the net on what to feed canary chicks, so I have hard boiled eggs and mixed them with grated carrots and have had to boil their seed.
The kids are loving watching them, it has been interesting watching them.
Hope you all had a great weekend, have a great week.

Sunday, October 24, 2010

Beautiful Butterflies

I am loving the Beautiful Butterflies Bigz Die.
I have enjoyed using it to make mobiles.
I have cased this from Amy Buchanan a Demonstrator in Ausie, go check here mobile its very beautiful after seeing hers I just had to case it.
I enjoyed making these, I have made 3 of them.
I have made 1 for Samuel's classroom and there topic this term is small creatures, then I promised to make 1 for the next clasroom also studying small creatures.
The third one I made for a very good friend Liz to hang in her shop.
This mobile is hanging in the window of Samuel's classroom, sorry about the poor photo, but just look at the view from the window. 
In the winter the view is just majestic with the Southern Alps all covered in snow.
We are truelly blessed with the beauty of God's almighty creation.
Supplies List
Card Stock: Concord Crush, Pear Pizzazz and Melon Mambo.
Big Shot: Big Shot, Beautiful Butterflies Bigz Die, Perfect Polka Dots, Vintage Wallpaper, and Manhatten Flower Embossing Folders.
Extra: Sticky Strip and Basic Rhinestones Jewels.
Hope you are all enjoying your Labour Weekend. 
I got out in the garden yesterday and planted Corn, Carrots, Beetroot and Radish Seeds. 
We are so looking forward to eating our own veges.
I will get some photos taken of my garden, sorry Bron that I haven't done that already.
Enjoy the rest of the weekend.

Thursday, October 21, 2010

With Sympathy

I have had 3 sympathy cards to make this week.
I have had 2 friends who have lost their father's this last week, they were both battling cancer.
Here's the card I made for Helen.
 I have used the In-Colours (Concord Crush, Pear Pizzazz, Poppy Parade, Blushing Bride and Peach Parfait) and Level 2 Hostess Stamp Set Apple Blossom.
I stamped the stamp in the same colour ink as the card, then mounted them on Whisper White Card Stock which I had trimmed using Scallop Trim Punch and mounted it on Sahara Sand Card Stock.
The cards that I made for Jean and Karyn were a brayered card, that I had spare left over from Christchurch Regional in August. Click here to orgional post.

Tuesday, October 19, 2010

Tuesday's Tip # 4.....

....Sponges.
Stampin' Up sell Sponges in a pack of 3 for $7.95 (NZ).
I cut my sponges into 12, some people like to use the sponges whole, others cut them into 4 or 8.
Isn't that great value 36 sponges for $7.95.
I find it easier to sponge with a 1/12 of a sponge, I get inky fingers but that's fine.
 I keep a sponge for each colour, so I punch out a tab using my Round Tab Punch I fold it over my sponge and staple it and label it. The sponge above will be my Pear Pizzazz sponge. 
No more having to wash my sponges.
Here is how I store my sponges and Daubers.
 I store both my sponge and dauber in the same area, in a container with dividers, I think I got my mine from 'The Warehouse'.
I now need to buy a new one and I will get my labeler out and put them into their Colour Collections.
Now here is project I have made, I have used sponges.
This Magnolia Flower is made using the Ornament Punch, which I have sponged with Blushing Bride Ink (In Colour), the leaves are punched out of Pear Pizzazz folded in half and put through the Crimper.
I found it on Sharri's Blog and click here to view the Video Tutorial.
I just Love it.

Monday, October 18, 2010

I Won...

...Some beautiful blog candy.
I left a comment on Lowri McNabb blog and I won her blog candy.
Here is a look inside the folder.
Isn't it just lovely, I especially love the wee note book on the left that she has personalised for me.
It's so sweet, I will be casing this project.
On the right there are 4 cards.
Thanks Lowri.
Lowri is one of the new DTs over at Artfull Crafts.

Saturday, October 16, 2010

Dress Up Christmas

Create beautiful packaging to fit any Christmas gift with exclusive products from Stampin’ Up!®
This Christmas season there are two ways to get FREE exclusive ribbon: get one spool of ribbon when you purchase a Christmas gift-giving bundle and one spool of ribbon when you host a $600 workshop!

Click here for more details on both the ribbons and bundles. 
Contact me today to book a workshop.

As Promised

The 'Midnight Madness' last night was great.
Today I have cleaned all my stamps and I'm in the middle of a stock take of all my stamps, inks and tools. 
I have labeling them all with there item #, price and page number etc.
Here are photos of the coupon books After School Club.
Samuel (5) made the the Green Galore one and Savannah made the other using Orchid Opulence, both retired colours.
I really like Samuel's, he has done a great job.
Hope you are enjoying your Saturday

Friday, October 15, 2010

Missing.....

...Where oh where has this week gone?
I have had an extremely busy week this week, I'm so glad that the kids have been back at school.
Wednesday for Kids Club at School the kids made 'Coupon Books' using up some of my retired Cardstock.
I will upload some photos tomorrow as my camera batteries have gone flat, I will go and charge them now.
Yesterday I was preparing for 2 workshops.
This morning I went to a local craft group for a workshop, we had great fun.
The ladies loved the Christmas Card they made.
So this afternoon I have unpacked and repacked for Tonight's Midnight Madness Workshop and finished making the door prize.
The door prize fits the brief for Just Add Ink Challenge this week.
JAI # 39 is Just Add Blue......
Pop on over to JAI and have a look at the DT exsamples, they are a bunch of very talented ladies.
I have filled it with some crafting bits and pieces and of course chocolate.
I have used Elegant Soiree DSP and of course more Pearls, Isn't it just so yummy.

This is truelly elegant paper, an excellent name.
Anyway I must go now and get tea then, I'm of to the Midnight Madness.
Have a great weekend everyone.

Tuesday, October 12, 2010

Tuesday's Tip # 3

Have I told you...
That I'm in love with the Basic Rhinestones and the Basic Pearls.
Especially the very tiny pearls.
I'm using them on nearly everything.
 Tuesday Tip
Both the Pearls and Rhinestone have adhesive on the back.
The instructions tell to gently peel from backing, been careful not to touch the adhesive or they will lose some of there tackiness, easier said than done .
So the best way I have found to remove them is to use your Scalpel Blade, poke the tip of the blade just under the Pearl or Rhinestone then you can remove it without touching it and adhere to your creation.
This the card that we made last night at a workshop as our 'Make 'n' Take'.
You guessed it, it has Basic Pearls on the Butterflies.
We also used Shimmer Paints and Colour Spritzer Tool.
Supplies List
Stamp Set: Butterfly prints.
Card Stock: Crumb Cake, Concord Crush, Pear Pizzazz and Whisper White.
Ink: Concord Crush.
Stampin' Write Markers: Concord Crush and Pear Pizzazz.
Accessories: Basic Pearls, Big Shot, Vintage Wallpaper Embossing Folder, Shimmer Paint Platinum, Sponges, Stamp-a-ma-jig, Stampin' Dimensionals, Butterfly Punch and Colour Spritzer Tool.

If you would like to get a group of friends together and would like me to come over or you come to my house for workshop and make a card like this one.
Contact me to book a date (all my contact details are on the Contact Me page at the top of my blog).

Saturday, October 9, 2010

JAI # 38

Hi Everyone, sorry I haven't blogged for a few day.
I have been very busy in my garden this week, with the help of my Dad we have planted tomatoes, cabbage green and red, cauliflower, broccoli, 2 varieties of lettuce, spring onions, strawberries and potatoes.
Thanks Dad for all your help.
So I haven't got any crafting done, with gardening and the Commonwealth Games on tv.
I haven't watched the games tonight and have been working on a birthday card for my Mother In Law, her birthday is next Friday.
After seeing the challenge at 'Just Add Ink' this week, I thought I would use Pink for the card.
JUST ADD BLING ... and PINK!
I don't like a lot of pinks (soft pinks especially) but I do like Melon Mambo so I have used that.
And after talking to Jennie my downline tonight about Shimmer Paints, I knew what I was going to do.
I have used the Floating Watercolour Technique using Watercolour Paper, Re-Inkers mixed with Frost White Shimmer Paint and Aqua Painters.
I sponged the Ink mixed with Shimmer Paint directly onto the stamp, it gives it a beautiful shimmer.
I decided less was more and added only 1 Rhinestone, for the dot on the I in birthday.
Supplies List
Stamp Sets: Fifth Avenue Floral and Perfect Punches.
Card Stock: Melon Mambo, Whisper White and Watercolour Paper.
Inks: Melon Mambo, Elegant Eggplant and VersaMark.
Extras: Frost White Shimmer Paint, Aqua Painters, Clear Embossing Powder, Embossing Buddy, Powder Pal, Big Shot, Manhattan Flower Embossing Folder, Basic Rhinestones, Sponges and Stampin' Dimensionals.
Have a great weekend.

Tuesday, October 5, 2010

Tuesday's Tip # 2

Hi everyone.
Can you believe it is Tuesday again, we are nearly through the school holidays.
I love the school holidays, no timetables or routine to meet. I often get up check to see if Samuel (5) needs anything brekkie etc, then I make my brekkie and cuppa and head back down to bed with the paper were I do the puzzles, then I read a chapter or 2 maybe 3 or 4 of my book and get up somewhere before midday.
Oh the life of it. 
Tuesday's Tip.
When you are using the Handheld 1/16" (2mm) Circle Punch and you need to see where you are punching the hole. 
Like in this Card.
I wanted the hole in the centre of the flower to place the Rhinstone Clear Brad.
To see the hole lift the cover where the punch outs get collected and you can see through.
Then Punch.
This is not my idea I think I read it on someones blog, sorry I can't remember where if it was you Thanks.
Enjoy the rest of school holiday (NZ).
We are planning a day in the garden tomorrow, planting veges, we prepared the plots on Monday.
Today we went and bought the plants and spend a few hours on the beach as it was so nice today.
We have been very blessed with beautiful spring weather for these holidays.

Monday, October 4, 2010

Time for Tea

This a wee gift I have made quite a lot of late.
I have used Priceless Stamp Set and Occasional Quotes Level 3 Hostess Stamp Set.
It is a great set I love the quotes, if you would like to earn this contact me and book a workshop.
Inside place a tea bag or a gift card and pop inside a card, a perfect wee gift for someone you care a lot about.
One of the new products that we have in the 2010 - 2011 Idea Book and Catalogue are the Pearls and Rhinestones, the adhesive on the back them easy to adhere and are perfect any project.
I have used the smallest Pearl on the Butterfly wing, I'm loving the tiny pearls very elegant.
The colours I have used are Bashful Blue, Concord Crush, Pear Pizzazz and Whisper White.
I'm loving this colour combo.

Sunday, October 3, 2010

I Have Cased....

...Another Michelle Zindorf card.
You must go and have a look at her blog here, she does the most amazing pieces of work with her Brayer and Stamps.
Michelle is a Demonstrator in the West Alexandria, USA. 
She teaches Stamping and Brayer Workshops all across the States.
If she was ever to come to New Zealand, I would be there with bells on, I would beg, borrow or steal to get to wherever she would be teaching (just kidding about stealing but I think you get the gist of what I saying).
Go and check her blog, she has 364 tutorials.
Here is my CASE (Copy And Share Everything) of her latest tutorial #364 found here.
I had fun making it, it was a quick card to make.
Please don't be too harsh on me if you are comparing it to Michelle's, I do love it.
I have used a different tree stamp to what Michelle has used as we don't have that one in NZ.
Supplies List
Stamp Sets: Winter Post and Lovely as a Tree.
Inks: Basic Black, Not Quite Navy, Night of Navy and Baja Breeze.
Card Stock: Basic Black, Baja Breeze, Sahara Sand and Whisper White.
Accessories: Brayer, Stamp-a-ma-jig, White Gel Pen, Sponges, Basic Black Stampin' Write Marker and Post it Notes(not SU).

Saturday, October 2, 2010

Happy World Card Making Day

Kaye phoned me about 6 weeks ago asking if I had plans for today.
She asked if a group could come from Farlie.
So to celebrate World Card Making Day, I had 5 ladies from Farlie and 1 local.
They have had a whole day in town and we all had a great afternoon card making.
They make 2 cards a christmas and for you card.
Here's the Christmas card they made.
This a very quick and simple card to make, it only has 1 piece of card the rest is Inks and Dazzling Diamonds.
The second card we used 'For You Flower, a la carte Stamp' .
 We used Soft Suede and Old Olive Cardstock and tiny strip of Greenhouse Gala DSP with Poppy Parade (In Colour) and Soft Suede Ink. We ran the Old Olive through the Big Shot using Vintage Wallpaper Embossing Folder, we tied some Hemp Twine and mounted the flower with Dimensionals.
Then I showed the how they could step it up by appling Crystal Effects on the centre off the flower.